Tuesday, January 24, 2017

Say hello to my little friend....the wonderful world of Kale.

We've all heard the hype surrounding kale.  This once little known vegetable has gained popularity over the past few years as a wonder food of sorts.  Packed with fiber, vitamin C, vitamin K, and anti-oxidants - our little green friend is now used in everything from smoothies to chips. Check out this link to find out more about the health benefits of kale (http://www.mindbodygreen.com/0-4408/Top-10-Health-Benefits-of-Eating-Kale.html).

While kale is a quite lovely little plant, many people fear it.  Will it taste like cardboard?  Won't it be stuck in my teeth all day?  These are valid concerns.  However, I have come up with a recipe that actually takes advantage of kale's unique characteristics and....wait for it....tastes amazing!  Ready??  Here we go!


Warm Kale and Quinoa salad

For the salad:
6 large kale leaves
1 cup cooked quinoa
1/4 cup toasted slivered almonds
handful of dried cherries

For the dressing:
1/4  cup orange juice
2 tablespoons high quality olive oil
2 cloves of garlic - minced or pressed
a dribble of basalmic vinegar

To assemble -
Mix all the dressing components together and set aside.
Cook the quinoa according to the directions on the package.
While quinoa is cooking - remove the rib from the kale and slice it thinly.  Place it in a bowl.
You can be toasting the almonds now also.
Dump the warm quinoa onto the kale.  Toss in the toasted almonds and dried cherries.
Pour the dressing over and mix well.

Eat while still warm.

Enjoy!  And please let me know if you like this recipe.  Comments are welcome!

Tuesday, January 17, 2017

Almost Paleo Stuffed Peppers

I know it isn't Friday but I had to share this recipe with you.  We got home late last night and I needed a quick dinner.  So I whipped up a batch of lovely stuffed red peppers paleo style.

4 large red bell peppers 
1 lb pork sausage
1 lb ground beef
1/2 cup chopped onion
1 cup of cauliflower rice
1 can Rotel
cayenne pepper and paprika to taste

Start by cutting a hole around the stem of the bell peppers and seeding them.  Then boil them for about 7 minutes - until they are slightly cooked but still firm.  Set them aside to cool.

While the peppers are cooking you can start the cauliflower rice.  For the amount you need - you will use about 1/2 a large head of cauliflower.  Grate it up and place it on a cookie sheet in a thin layer.  Bake at 350 until most of the moisture is gone.

While the rice is drying out in the oven - cook the meat and the onions.  When they are cooked, add the can of Rotel and the spices.

Once the cauliflower rice is fairly dried out - just add it right into the meat mixture and stir to combine thoroughly.

OK!  Now it is time to stuff those bad boys!

Fill each of the red peppers with the meat mixture until it is just about even with rim of the pepper.  Stand the stuffed peppers up in a baking dish and sprinkle some of your favorite cheese over the top of the meat.  Bake them in your already warmed up oven until the cheese is bubbly and golden brown.  

ENJOY!

If you are looking for a true paleo version, just lose the cheese and you are there.

Tuesday, January 3, 2017

Seed Catalog Pilgrimage

The arrival of the New Year means delivery of the annual seed catalogs.  This event is something I look forward to every year.  I love looking through all the colorful delightful pages of beautiful vegetables, herbs, and flowers.  Learning about all the varieties and possibilities.  I start dreaming and planning for my garden and all the wonderful food I will grow this season.  Gardening is in my blood - we always had a huge garden as a child - probably because we needed to supplement our family.  We were not rich and my parents helped stretch their budget by growing vegetables, picking fruits, and bartering for meat.  As a child, I did not love the garden.  It represented work to me.  I would have sworn that instead of vegetables we grew rocks.  Every spring we spent hours picking rocks from the garden in preparation for planting.  They seemed to multiply over the winter.

As an adult living in various cities my gardening was limited to pots.  I pretty much always had tomatoes, peppers, and herbs growing somewhere in my yard or on my apartment patio.  With the decision to move away from city life seven years ago, my gardening opportunities increased greatly.  I am expanding my crops yearly and learning how to make the most of my garden space.  I am experimenting with companion plants, natural soil supplements, and alternative pest control options.  DH and I took a 6 week sustainable farming class through the local University Extension last winter where we learned how much we don't know about farming!

Last year, with the purchase of our land, my gardening activities were much more interesting than usual.  It is my intention to eventually have a combination of raised beds and traditional rows for my veggies plus a small orchard.  But right now we have bare ground.  That fact is both exhilarating and daunting.  We have a lot of work ahead of us, however, we also have a blank slate to work with.  I am thrilled with the thought of planning out my garden from the very bare earth and designing it how I want it.  It is also our goal with this garden to make it as self-sufficient as possible so that we are not completely tied down during the summer season. Water systems will be efficient and automatic. Weeds will be deterred with mulches and ground covers.  Because as much as we like to eat fresh food - we also like to play!

Last summer we got the garden started by fencing a 60x60 foot patch of hay field to prevent deer and elk from getting in. Our neighbor came over and plowed it up for us.  We didn't have time to get in a drip line system so we hand watered all summer.  Lesson learned!  We will have a drip line system in this year.  We didn't have a lot of time to prepare so the garden was pretty limited but we did end up with some nice vegggies.  And boy did we learn a lot!  

This fall we scored some big tractor tires from a local farmer for free and I started my garlic in one in October.  I will use some of them for planters up by the barn and some in the garden for warm season crops like tomatoes.  Stay tuned - I'll take you along on the journey!


Garden before plowing.


Garden after plowing.

Monday, January 2, 2017

All Natural Angus Cookies


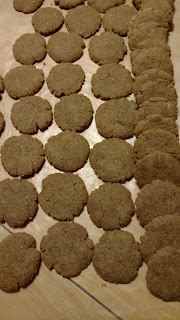
Angus Cookies

My sweet Rottie Angus got caught trying to snag a warm chocolate chip cookie from the kitchen table a few weeks ago.  His heart was broken that those delicious smelling creations were not for him.  He watches intently every week when I make my DH cookies and really wants to try one.  This weekend, after seeing his pitiful face - I promised to make him some cookies of his own.  One small problem - Angus has a lot of food allergies.  Typical dog cookies with any traditional meat (chicken, beef, lamb) are out.  Grains are also a no-no. So today I set out to develop a grain free - meat free recipe for cookies that my sweet boy can eat without suffering from the itchies later.  

Ingredients

2 cups almond flour
1/2 cup flax meal
1 cup natural (no sugar!) peanut butter
1 tablespoon raw wild honey
1 teaspoon baking powder
1 egg
1/2 cup water

Preheat oven to 350 degrees F

Mix all ingredients together until it looks like cookie-ish dough.  It will be a bit oily from the peanut butter and won't quite have the consistency of human peanut butter cookie dough.

Form dough into 1.5 inch balls and press flat into circles that are between 1/3 and 1/4 inch thick.  Place on ungreased baking sheet and bake for 8-10 minutes.  They do not spread out at all so you can really load the baking sheet up.  The bottom side will brown and the top will not so don't be fooled into thinking they aren't done after 10 minutes.  

This recipe makes five dozen tasty healthy cookies.  They last a week in an airtight container, longer if refrigerated.  Angus definitely approves!

You could also roll the dough out and cut out cute shapes but I can't find my rolling pin at the moment so circles is what Angus got.  I think if you want to roll the dough you may want to add a bit more almond flour and refrigerate the dough before attempting to roll it.